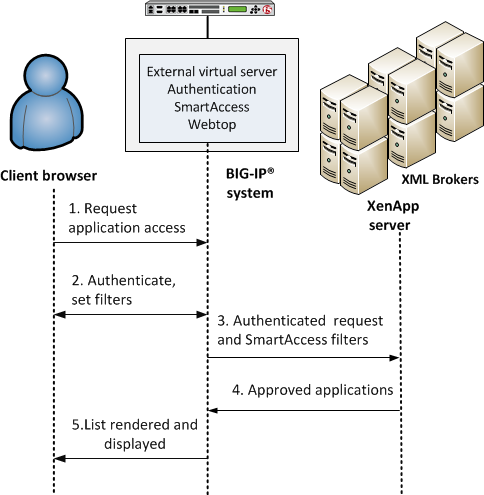
APM integration with Citrix XML Brokers
- A user (client browser or Citrix Receiver) requests access to applications.
- The virtual server starts an access policy that performs authentication and sets SmartAccess filters.
- The virtual server sends the authenticated request and filters to a Citrix XML Broker.
- An XML Broker returns a list of allowed applications to the external virtual server.
- The virtual server renders and displays the user interface to the client on an Access Policy Manager webtop.
- The client selects the application to launch.
- Webtop requests ICA file from XML Broker.
- Webtop reconfigures ICA file to enable proxy of farm member transport.
- ICA file is passed to the client and executed.
- Webtop initiates a connection to the farm member.
- Session is initiated
The above workflow requires that the Citrix iApp be deployed on your F5 infrastructure and that the Citrix DDC servers are configured to accept XML requests.
To modify DDC to accept XML requests for XenDesktop 5.6, or XenDesktop 7.x (required for F5 integration)
1. Open Windows PowerShell
2. Type asnp Citrix* to verify the Citrix cmdlets are available.
3. Type Set-BrokerSite – TrustRequestsSentToTheXmlServicePort $true.
4. Verify setting and type Get-BrokerSite and look to see if TrustRequestsSentToTheXMLServicePort’ is equal to True.
Downloading and importing the iApp template
The first task is to download and import the new Citrix XenApp and XenDesktop iApp template. To download and import the iApp
1. Open a web browser and go to downloads.f5.com.
2. Click Find a Download.
3. In the BIG-IP F5 Product Family section, click iApp Templates.
4. On the Product Version and Container page, click iApp-Templates.
5. Accept the EULA, and then download the iapps zip file to a location accessible from your BIG-IP system.
6. Extract (unzip) the f5.citrix_vdi.v.tmpl file.
7. Log on to the BIG-IP system web-based Configuration utility.
8. On the Main tab, expand iApp, and then click Templates.
9. Click the Import button on the right side of the screen.
10. Click a check in the Overwrite Existing Templates box.
11. Click the Browse button, and then browse to the location you saved the iApp file.
12. Click the Upload button. The iApp is now available for use.
To upgrade an Application Service to the current version of the template
1. On the Main tab, expand iApp and then click Application Services.
2. From the list, click the name of the Citrix Application Service you created using the previous version of the template.
3. On the Menu bar, click Reconfigure.
4. In the Template Selection area, from the Template row, click the Change button.
5. From the Template list, select the new Citrix iApp template you downloaded.
6. Review the answers to your questions in the iApp. You may modify any of the other settings as applicable for your implementation. Use the inline help for information on specific settings.
7. Click Finished. The upgrade is now complete and all applicable objects appear in the Component view.
Deploying the iApp Template
1. Log on to the BIG-IP system.
2. On the Main tab, expand iApp, and then click Application Services.
3. Click Create. The Template Selection page opens.
4. In the Name box, type a name. In our example, we use Citrix-XenApp-.
5. From the Template list, select f5.citrix_vdi.v. The Citrix template opens.
